Quickstart
This quickstart walks through a minimal but complete GEMC simulation:
- Generate a geometry system with a target and a flux detector using
system_template.py. - Build the geometry database with Python.
- Shoot protons at the target and count the tracks crossing the detector.
Create a system
Run system_template.py from a directory of your choice to create a counter/ subdirectory
with ready-to-run geometry and materials scripts:
system_template.py -s counter
The command prints the list of generated files:
Writing files for experiment >examples<, system template >counter< using variations >['default']<:

  - counter.py
  - geometry.py
  - materials.py
  - README.md

  - Variations defined in counter.py:
    * default
The generated files define a geometry with a methane-gas target and a flux detector,
and include a YAML steering card that shoots protons at the target.
To see all available options:
system_template.py -h
Build the geometry
Go into the counter directory and run counter.py to write the geometry and materials to a SQLite database:
cd counter
./counter.py
The script creates gemc.db in the current directory and reports what it stored:
  ❖ Database file gemc.db does not exist
  ❖ Created new SQLite database: gemc.db

  ❖  GConfiguration for experiment <examples>,  system <counter> :
	▪︎ Factory: sqlite
	▪︎ SQLite File: gemc.db
	▪︎ (Variation, Run): (default, 1)
	▪︎ Number of volumes: 2
	▪︎ Number of materials: 2
Note
Add -pv or -pvb to display the geometry interactively as it is built (requires PyVista).
Interactive view:
Run GEMC
Use the counter.yaml steering card to run the simulation. Add -gui for the interactive Geant4 viewer:
gemc counter.yaml -gui
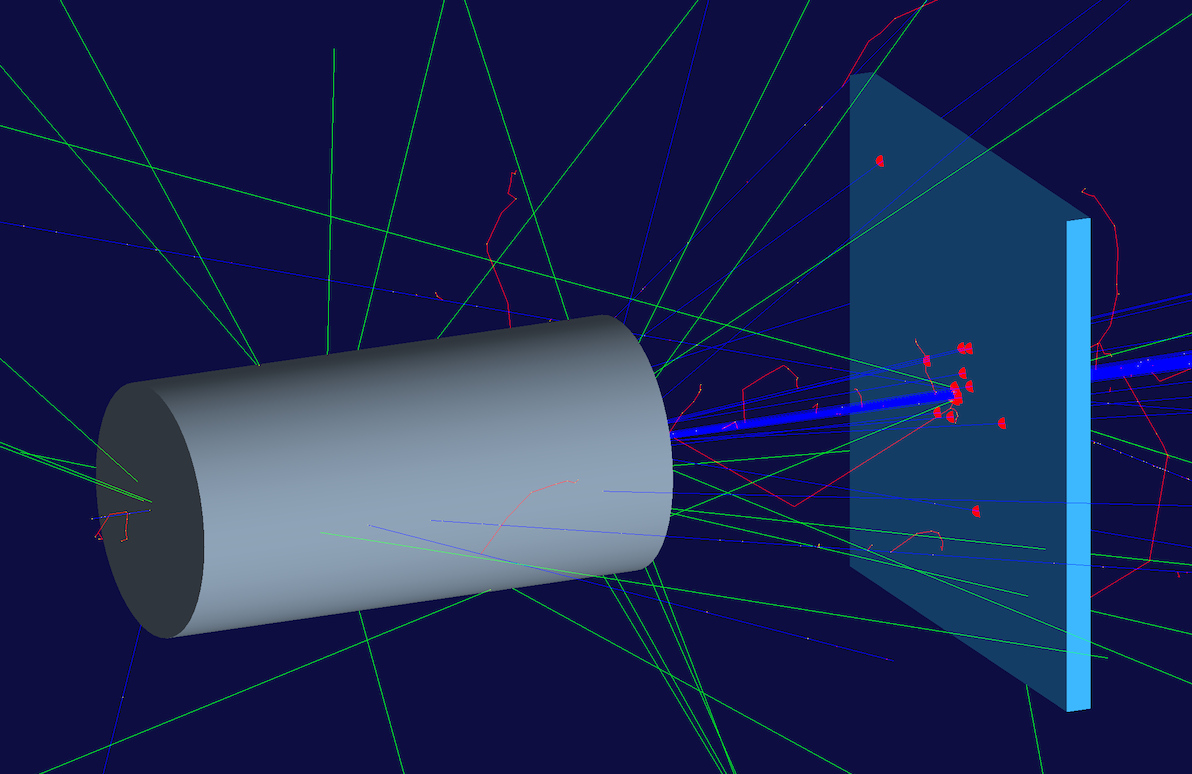
Click Run in the Geant4 GUI to start the simulation. With n: 100 events and a proton beam
aimed along the z-axis, all 100 tracks should cross the flux detector. Hits are highlighted in red.
To run in batch mode:
gemc counter.yaml
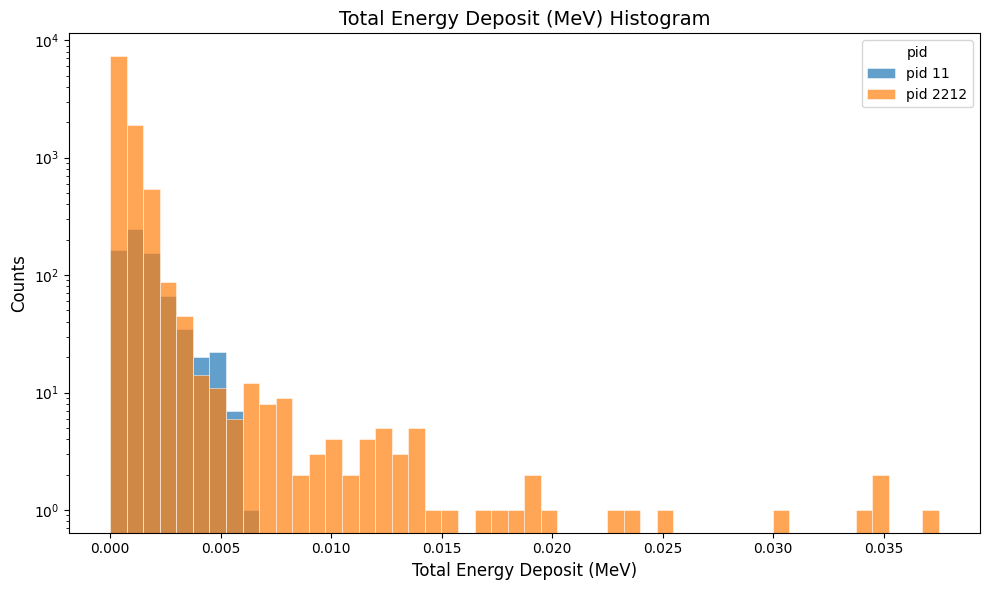
Plot total energy deposited
Run 10,000 events to get good statistics:
gemc counter.yaml -n=10000
Plot the digitized totEdep variable — the total energy deposited in each flux hit:
python3 -m analyzer counter_t0_digitized.csv totEdep --kind csv --bins 50
Output
The YAML steering card writes two output formats: csv and json. Output filenames include
_t<T> where T is the thread number, e.g. counter_t0_digitized.csv and counter_t0.json.
The CSV format produces several files per thread:
- counter_t0_digitized.csv — digitized hit variables (one row per hit)
- counter_t0_true_info.csv — raw Geant4 true information (one row per step)
- counter_t0_generated.csv — all generated particles (one row per particle)
- counter_t0_generated_tracked.csv — all generated particles that are tracked in the simulation
An example of digitized row:
| evn | timestamp | thread_id | detector | hitn | pid | tid | E | time | totEdep |
|---|---|---|---|---|---|---|---|---|---|
| 0 | Wed 05.20.2026 06:59:52 | 0 | flux | 0 | 2212 | 1 | 1769.26 | 0.58366 | 0.000164249 |
The JSON format keeps all hits for each event in a single file per thread (counter_t0.json):
{
  "type": "event",
  "events": [
    {
      "event_number": 0,
      "header": {
        "timestamp": "Wed 05.20.2026 07:09:10",
        "thread_id": 0,
        "g4local_event": 0,
        "generated": {
          "generated": [
            {
              "name": "proton",
              "pid": 2212,
              "type": 1,
              "multiplicity": 1,
              "p": 1500,
              "theta": 0,
              "phi": 0,
              "vx": 0,
              "vy": 0,
              "vz": -50
            }
          ]
        },
        "detectors": {
          "flux": {
            "true_info": [ { "address": "box->2", "vars": { ... } } ],
            "digitized": []
          },
          "digitized_by_detector": {
            "flux": [
              {
                "address": "box->2",
                "vars": {
                  "hitn": 0, "pid": 2212, "tid": 1,
                  "E": 1769.26, "time": 0.58366, "totEdep": 0.000164249
                }
              }
            ]
          }
        }
      }
    }
  ]
}
gstreamer
The
gstreameroption allows select the name and format of the output. Rungemc help gstreamerto check its documentation:-gstreamer=<sequence> ......: define a gstreamer output • filename: name of output file. Default value: NODFLT • format: format of output file. Default value: NODFLT • type: type of output fileDefault value: event Define output formats and filenames. It can be used to select <events> or <frame> streams. The file extension is added automatically based on the format. Supported formats: - jlabsro - root - ascii - csv - json Output types: - event: write events - stream: write frame time snapshots Example that defines two gstreamer outputs: -gstreamer="[{format: root, filename: out}, {format: csv, filename: out}]" The produced files structure depends on the accumulation method used: - event-based digitization (like <flux>) will have one file per thread, with "_t<thread#>" appended to the filename - run-based digitization (like <dosimeter>) will have one output file
More Details
The following sections explain the main files in more detail.
The main script: counter.py
counter.py declares the system and delegates geometry and material construction to two helper modules:
cfg = autogeometry('examples', 'counter')

define_materials(cfg)
build_counter(cfg)
autogeometry declares the counter system inside the examples experiment and returns a
configuration parameters that are passed to the builders.
Defining the geometry: geometry.py
build_counter creates two volumes: a cylindrical methane-gas target and a rectangular flux detector:
def build_flux_box(configuration):
    gvolume = GVolume('flux_box')
    gvolume.description = 'air flux box'
    gvolume.make_box(40.0, 40.0, 2.0)
    gvolume.set_position(0, 0, 100)
    gvolume.material    = 'G4_AIR'
    gvolume.color       = '3399FF'
    gvolume.style       = 1
    gvolume.digitization = 'flux'
    gvolume.set_identifier('box', 2)
    gvolume.publish(configuration)

def build_target(configuration):
    gvolume = GVolume('target')
    gvolume.description = 'methane gas target'
    gvolume.make_tube(0, 20, 40, 0, 360)
    gvolume.material    = 'methaneGas'
    gvolume.publish(configuration)
make_box and make_tube are helper methods that set the solid type and parameters in one call.
The flux box is assigned the flux digitization, which records a hit for every track that crosses it.
No Geant4 C++ objects (G4VSolid, G4LogicalVolume, G4PVPlacement, etc.) appear in the script.
GEMC constructs them internally from the database entries written by publish.
Defining the material: materials.py
The target uses a custom methaneGas material defined by atom count:
gmaterial = GMaterial("methaneGas")
gmaterial.description = "methane gas CH4 0.000667 g/cm3"
gmaterial.density = 0.000667
gmaterial.addNAtoms("C", 1)
gmaterial.addNAtoms("H", 4)
gmaterial.publish(configuration)
Note
The code generated by system_template.py could all live in counter.py. Splitting into
geometry.py and materials.py is a convention that keeps larger projects readable.
The steering card: counter.yaml
runno: 1
n: 100               # number of events

nthreads: 1          # single thread → one output file per format

gparticle:
  - name: proton
    p: 1500          # momentum in MeV/c
    vz: -5.0         # vertex z in cm, just before the target

verbosity:
  - gsystem: 1

gsystem:
  - name: counter
    factory: sqlite  # read geometry from gemc.db

gstreamer:
  - filename: counter
    format: csv
  - filename: counter
    format: json

root: G4Box, 15*cm, 15*cm, 15*cm, G4_AIR   # world volume
Remove nthreads: 1 to use all available cores; each thread writes its own output file.
Add a gstreamer entry with format: root for ROOT output.
The root entry defines the Geant4 world volume inline in the steering card. root could also be defined in the geometry scripts.